
Milgard windows offer diverse styles for enhancing homes, boosting energy efficiency, and improving curb appeal.
Proper installation is key to maximizing these benefits, ensuring durability and long-term performance.
This guide details Milgard’s quality and style, covering project planning through installation, and emphasizes the importance of certified installers.
Overview of Milgard Windows
Milgard stands as a prominent manufacturer renowned for its commitment to quality and innovation in the window and door industry. Offering a comprehensive range of window styles – including vinyl, fiberglass, and aluminum – Milgard caters to diverse architectural preferences and budgetary needs.
Their windows are engineered for energy efficiency, often featuring advanced glass packages and weather-stripping systems to minimize heat transfer and reduce energy costs. Milgard’s dedication extends beyond product design; they emphasize proper installation as crucial for realizing the full potential of their windows.
Selecting a certified installer, like those holding AAMA Installation Masters certification, ensures adherence to industry best practices, guaranteeing a secure, weathertight, and long-lasting installation. This overview sets the stage for understanding the importance of meticulous preparation and execution when embarking on a Milgard window replacement project.
Benefits of Replacing Windows
Replacing old windows with high-quality Milgard replacements delivers substantial advantages for homeowners. Beyond enhanced curb appeal and increased home value, new windows significantly improve energy efficiency, reducing heating and cooling costs. Modern window technology minimizes drafts and heat transfer, creating a more comfortable living environment.
Milgard windows also offer improved noise reduction, contributing to a quieter and more peaceful home. Proper installation, particularly utilizing techniques like sealing with window tape and caulk, is paramount to maximizing these benefits.
Furthermore, updated windows enhance home security and ease of operation. Investing in professional installation, ideally by an AAMA certified installer, guarantees a long-lasting, weathertight seal and optimal performance, protecting your investment for years to come.
Understanding Window Styles (Milgard Specific)
Milgard offers a diverse range of window styles, each suited to different architectural designs and homeowner preferences. These include single-hung, double-hung, casement, awning, sliding, and picture windows. Understanding the nuances of each style is crucial for a successful installation.
Milgard’s retrofit options are particularly popular for replacement projects, designed to fit within existing frames, minimizing disruption. However, each style requires specific installation techniques. For example, casement windows necessitate precise hinge alignment, while sliding windows demand smooth gliding action.
Because every window is unique, carefully review Milgard’s specific installation guidelines for your chosen style. Consulting with a certified installer ensures the correct approach is taken, maximizing performance and warranty coverage.

Pre-Installation Planning & Preparation
Successful Milgard window installation begins with meticulous planning. Accurate measurements, correct window ordering, and a comprehensive tools checklist are essential for a smooth process.
Measuring for Milgard Replacement Windows
Precise measurements are paramount for a successful Milgard window replacement. Begin by measuring the rough opening – the framed space where the old window resided – in width and height.
Measure at multiple points, as openings aren’t always perfectly square.
Record the smallest width and height measurements; these dictate the maximum window size.
Next, measure the existing window’s dimensions – width and height between the frame’s exterior edges.
Consider the window style; retrofit installations require different measurements than new construction.
Remember that every window is unique, and guidelines may vary, so consult Milgard’s specific instructions or a professional for clarification. Accurate data prevents costly errors!
Ordering the Correct Window Size & Type
Milgard offers diverse window types – vinyl, wood, fiberglass – and styles like double-hung, casement, and sliding. Selecting the right type impacts aesthetics, energy efficiency, and cost.
When ordering, never rely solely on the old window’s measurements. Use the precise measurements obtained during the measuring phase. Specify the exact size, including width and height, to the nearest 1/8 inch.
Clearly indicate the window style and any desired options, such as grid patterns, glass types, and hardware finishes. Confirm all specifications with the supplier before finalizing the order.
Consider consulting with a certified installer to ensure compatibility and proper fit, especially for retrofit installations.
Tools and Materials Checklist
Essential tools include a measuring tape, level, utility knife, drill with various bits, screwdriver set, hammer, caulk gun, and safety glasses. A pry bar is crucial for removing old trim, while a reciprocating saw aids in stubborn window unit removal.
Materials needed encompass shims, insulation (foam or fiberglass), window tape, exterior-grade caulk, screws, and potentially wood for minor framing repairs. Ensure you have appropriate flashing tape for weatherproofing.
Don’t forget dust masks and gloves for safety during demolition and handling materials. Having a drop cloth protects flooring.
Verify all Milgard-specific installation hardware is included with the new windows before starting the project.

Removing the Old Windows
Safety first: wear protective gear. Carefully detach interior trim and casings, then remove the old window unit, inspecting for any hidden damage or issues.
Prioritize cautious demolition to avoid damaging the surrounding wall structure during the removal process.
Safety Precautions for Window Removal
Prioritize personal safety throughout the entire window removal process. Always wear safety glasses to protect your eyes from flying debris, and consider gloves to shield your hands from sharp edges of glass or old hardware.
A dust mask is essential to prevent inhalation of dust and potential mold spores disturbed during removal. Be mindful of potential lead paint in older windows – appropriate precautions, like a respirator, may be necessary.
Ensure a stable work area and have a helper assist with lifting heavier window units. Carefully assess the window’s condition before attempting removal; a cracked or fragile window requires extra caution. Dispose of broken glass responsibly, following local regulations. Finally, be aware of your surroundings and potential hazards like electrical wiring or plumbing within the wall cavity.
Detaching Interior Trim and Casings
Begin by carefully scoring any paint along the interior trim with a utility knife to prevent damage to the surrounding wall. Use a pry bar and wood shims to gently detach the trim pieces – work slowly to avoid splintering or breaking the wood.
Start at the corners and work your way along the sides. Note the location of any nails or screws for easier reinstallation later. Once the trim is removed, carefully inspect the casings for any hidden fasteners.
Be cautious when removing casings, as they may be attached directly to the window frame; Document the original configuration with photos for reference during the finishing stage. Preserve the trim pieces if you plan to reuse them, cleaning and repairing any damage as needed.
Removing the Old Window Unit
After detaching the interior trim, carefully remove any exterior stops or retaining clips securing the old window unit. Use a reciprocating saw to cut through the caulking around the window frame, both inside and outside. Exercise caution to avoid damaging the surrounding wall structure.
With a helper, gently push the old window unit from the inside, supporting it as it comes free. Be prepared for potential weight and ensure a clear path for removal. Inspect the rough opening for any remaining nails, screws, or debris.
Dispose of the old window responsibly and thoroughly clean the rough opening, preparing it for the new Milgard window installation.
Preparing the Opening
Inspect the rough opening for damage, ensuring it’s square, level, and plumb. Address any rot or damage to the framing before installing the new Milgard window.
Inspecting the Rough Opening

Before installing your new Milgard window, a thorough inspection of the rough opening is absolutely crucial. Carefully examine the framing for any signs of rot, decay, or structural damage. Pay close attention to the sill, jambs, and header, as these areas are most susceptible to moisture intrusion.
Ensure the opening is adequately sized to accommodate the new window unit, allowing for proper shimming and insulation. Check for any obstructions, such as old nails, screws, or debris, that could interfere with a smooth installation. A clean and sound opening is fundamental for a secure and energy-efficient window installation. Addressing issues now prevents future problems.
Confirm the opening dimensions align with your ordered window specifications. Any discrepancies must be rectified before proceeding to ensure a proper fit and optimal performance of your Milgard replacement window.
Ensuring a Square and Level Opening
Achieving a perfectly square and level rough opening is paramount for a successful Milgard window installation. Use a level to check both the sill and jambs, identifying any inconsistencies. A square ensures the window operates smoothly and seals effectively against the elements.
If the opening is out of square, carefully shim the sides to bring it into alignment. Avoid excessive shimming, as this can compromise the structural integrity of the wall. Minor adjustments are acceptable, but significant deviations require professional attention.
A level sill is equally important, preventing water from pooling and causing potential damage. Correct any unevenness with shims or wood shims before proceeding. A properly prepared opening guarantees a flush, secure fit for your new Milgard window.
Addressing Rot or Damage to the Framing
Before installing the new Milgard window, thoroughly inspect the existing rough opening for any signs of rot, decay, or structural damage. This is a critical step often overlooked, potentially leading to future problems. Probe the wood with a screwdriver to identify soft or crumbling areas.
If rot is present, carefully remove the damaged wood using a chisel or saw. Treat the exposed wood with a wood preservative to prevent further deterioration. For extensive damage, consider reinforcing the opening with additional framing members.
Ensure the remaining framing is sound and capable of supporting the new window’s weight. Repair any cracks or weaknesses before proceeding with the installation. A solid, stable opening is essential for a long-lasting, trouble-free window replacement.
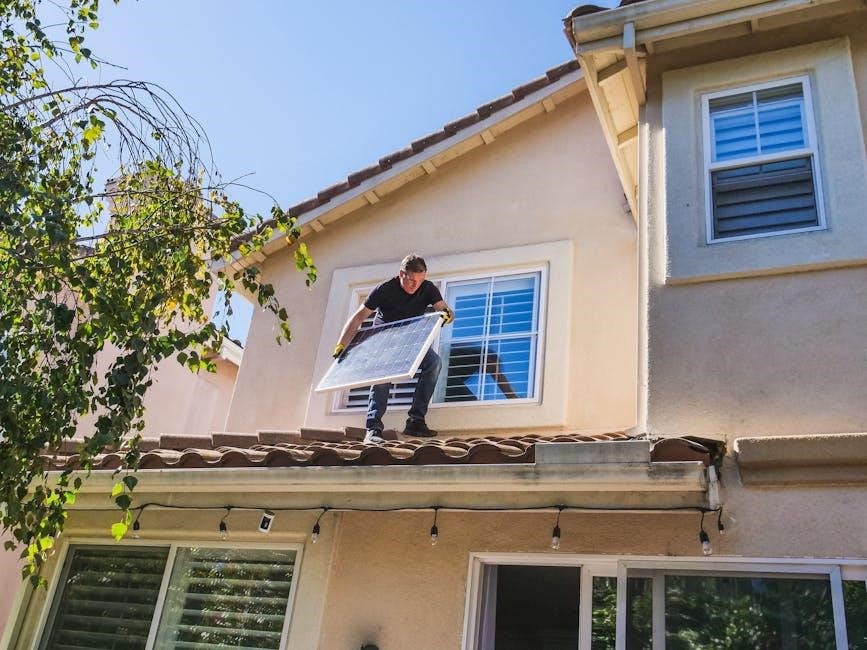
Installing the New Milgard Window
Carefully position the Milgard window into the prepared opening, ensuring a snug fit. Utilize shims to achieve proper alignment and plumb, crucial for smooth operation.
Secure the window frame using appropriate fasteners, following Milgard’s specific guidelines for optimal stability and weather resistance.
Positioning the Window in the Opening
Carefully maneuver the new Milgard window into the prepared rough opening. Ensure the unit isn’t forced, as this could damage the frame or distort its shape. Center the window within the opening, leaving consistent space on all sides for insulation and shimming.
Check for a proper fit – the window should sit flush with the exterior siding and interior wall surfaces. Gently lift and lower the window to confirm it moves freely within the opening before proceeding. Proper positioning is vital for optimal performance and prevents future issues like air leaks or operational difficulties. Take your time and double-check alignment before securing the unit.
Remember every window is unique, so consult specific Milgard instructions for your model.
Shimming for Proper Alignment
After positioning the window, utilize shims to achieve perfect alignment. Insert shims between the window frame and the rough opening at multiple points – typically corners and along the sides. Use non-expanding foam shims to avoid warping the frame.
Carefully adjust the shims to ensure the window is plumb, level, and square. A square window is crucial for smooth operation and a tight seal. Check both the vertical and horizontal alignment using a level and a square. Avoid over-tightening the shims, as this can also distort the frame.
Regularly reassess alignment throughout the shimming process. Proper shimming is foundational for a successful, long-lasting Milgard window installation.
Fastening the Window Frame
Once the window is shimmed and perfectly aligned, it’s time to securely fasten the frame to the rough opening. Use appropriate fasteners – typically screws – designed for window installation. Ensure the screws penetrate deep into the framing studs for a strong hold.
Pre-drilling pilot holes is recommended to prevent splitting the wood. Drive the screws straight and avoid over-tightening, which can damage the frame or strip the screw holes. Fasten through the window frame’s pre-drilled holes, ensuring even distribution of fasteners around the perimeter.
Double-check the alignment after fastening. A properly secured frame is essential for energy efficiency and long-term window performance.

Insulation and Sealing
Proper insulation and sealing are crucial for energy efficiency, preventing drafts, and ensuring a watertight installation of your Milgard windows.
Utilize window tape and caulk strategically, focusing on creating an airtight barrier around the window frame.
Applying Insulation Around the Window
Effective insulation is paramount for maximizing the energy efficiency of your newly installed Milgard windows. After positioning and shimming the window, carefully apply insulation to fill the gap between the window frame and the rough opening.
Low-expansion spray foam is often recommended, as it expands minimally, preventing distortion of the window frame. Ensure the foam completely fills the cavity without overfilling, which could create pressure.
Alternatively, fiberglass or mineral wool insulation can be used, carefully packed into the space. Avoid compressing the insulation, as this reduces its effectiveness. Remember to leave space at the sill for potential water drainage.
This step significantly reduces air infiltration and contributes to lower energy bills, enhancing the overall comfort of your home.
Using Window Tape and Caulk (Specific Techniques)
Proper sealing is crucial for a weather-tight Milgard window installation. Begin by applying window tape to both sides of the window fin, creating a solid barrier against air and water.
Next, apply a consistent bead of high-quality caulk around the window tape, but importantly, not directly onto the fin itself. This technique allows for expansion and contraction without compromising the seal.
Focus on creating a continuous, unbroken bead, ensuring complete coverage of the gap between the window frame and the rough opening. Pay close attention to corners and intersections, where leaks are most likely to occur.
This method, as recommended by installers, provides a durable and effective seal, preventing drafts and moisture intrusion.
Importance of Air Sealing
Effective air sealing is paramount for maximizing the energy efficiency and comfort benefits of your new Milgard windows. Gaps and cracks around the window frame allow conditioned air to escape and unconditioned air to enter, increasing energy bills and creating drafts.
Proper insulation and sealing minimize these air leaks, contributing to a more consistent indoor temperature and reduced heating/cooling costs. A well-sealed window also prevents moisture intrusion, protecting against mold growth and structural damage.
Combining window tape and caulk, using the specific techniques outlined, creates a robust air barrier. Prioritizing air sealing ensures your Milgard windows perform optimally for years to come.
Finishing Touches & Final Inspection
Install interior trim for a polished look, then thoroughly test window operation. Final caulking and cleanup complete the Milgard window installation process.
Installing Interior Trim and Casings
Carefully measure and cut the interior trim and casings to fit snugly around the new Milgard window frame. Ensure a precise fit for a professional finish, using a miter saw for accurate angled cuts. Apply a high-quality wood glue to the back of the trim pieces before positioning them against the window frame and wall.
Secure the trim using finishing nails, countersinking them slightly below the surface. Fill the nail holes with wood putty, allowing it to dry completely before sanding smooth. Once sanded, prime and paint or stain the trim to match your existing décor. Proper trim installation not only enhances the aesthetic appeal but also helps to conceal any gaps and further insulate the window.
Take your time and ensure a neat, clean installation for lasting beauty and performance.
Operating the Window and Checking Functionality
Thoroughly test the operation of the newly installed Milgard window. Open and close it several times, checking for smooth movement and ease of use. Ensure the locking mechanisms engage securely, providing a tight seal when closed. Inspect the window for any binding or resistance, which could indicate improper alignment or shimming.
Pay close attention to any unusual noises during operation, as these may signal a potential issue. Verify that all window components, such as screens and cranks (for casement windows), function correctly. Address any operational difficulties immediately to prevent further complications. A properly functioning window is crucial for comfort and energy efficiency.
Confirm everything works as expected before completing the final touches.
Final Caulking and Cleanup
Complete the installation with a final, meticulous caulking application around the exterior of the window frame. This seals any remaining gaps, preventing water infiltration and air leaks. Use a high-quality, paintable caulk specifically designed for windows and doors. Ensure a smooth, consistent bead for a professional finish.
Remove all debris, tools, and materials from the work area. Clean the window glass thoroughly, removing any fingerprints or smudges. Dispose of old window components and packaging responsibly. A clean workspace demonstrates attention to detail and respect for the homeowner’s property. Inspect the surrounding area for any damage and address it promptly.
A spotless finish ensures customer satisfaction and a lasting impression.

Troubleshooting Common Installation Issues
Addressing alignment, water leaks, and operational difficulties are crucial. Proper shimming, sealing with tape and caulk, and careful inspection resolve most problems.
Expert installers and Milgard’s warranty support offer solutions for complex issues.
Addressing Alignment Problems
Misalignment during Milgard window installation often stems from an uneven rough opening or insufficient shimming. Begin by re-checking the opening’s squareness and levelness; minor deviations can be corrected with shims placed strategically between the window frame and the rough opening.
Ensure shims are snug but don’t over-tighten, potentially warping the frame. Focus on corners and points where the window isn’t flush with the wall. If significant gaps persist, carefully loosen fasteners and re-shim, prioritizing a plumb and level installation.
Inspect the window’s operating mechanisms – sashes should move smoothly. Binding indicates a frame distortion. Correcting alignment issues early prevents air leaks, water intrusion, and operational difficulties, ensuring optimal window performance and longevity.
Dealing with Water Leaks
Water leaks around Milgard replacement windows typically indicate compromised sealing or improper flashing. First, meticulously inspect the exterior caulking for cracks or gaps, reapplying a high-quality, exterior-grade sealant. Verify the window tape is intact and properly adhered to both the window fin and the rough opening.
Crucially, ensure proper flashing is installed around the window’s perimeter, directing water away from the opening. If leaks persist, check the sill for adequate slope to facilitate water runoff. Addressing these issues promptly prevents water damage and maintains the window’s energy efficiency.
Remember, proper air sealing is vital; gaps allow moisture intrusion. A professional inspection can pinpoint hidden leak sources and ensure a lasting, watertight installation.
Resolving Operational Difficulties
Operational difficulties with newly installed Milgard windows often stem from improper alignment or binding during the installation process. Begin by checking if the window is correctly shimmed, ensuring it’s square and plumb within the opening. Carefully inspect the window’s operation – does it open and close smoothly?
If sticking occurs, slightly loosen the fastening screws and re-square the window, adding or adjusting shims as needed. Lubricate moving parts with a silicone-based lubricant, avoiding oil-based products that attract dust. Verify the locking mechanisms engage correctly and aren’t causing undue pressure.
For persistent issues, consult the Milgard warranty information or contact a certified installer for professional assistance. A properly installed window should operate effortlessly.
Milgard Warranty Information & Certified Installers
Milgard offers a comprehensive warranty, but proper installation by an AAMA Installation Masters Certified Installer is crucial for validation and long-term window performance.
Professional installation ensures adherence to standards, maximizing warranty benefits and guaranteeing lasting quality.
Understanding Your Milgard Window Warranty
Milgard’s warranty is a significant benefit, offering protection against defects in materials and workmanship, but it’s vital to understand its specifics. Coverage varies depending on the window series and components. Generally, glass is covered for a specific period against breakage and seal failure, while vinyl or fiberglass frames have longer warranties against fading, cracking, and structural issues.
However, the warranty is contingent upon correct installation. Improper installation, even with quality windows, can void the warranty. This is why utilizing an AAMA Installation Masters Certified Installer is paramount. They understand the precise requirements for maintaining warranty validity, including proper sealing, shimming, and fastening techniques.
Keep your installation documentation and warranty information readily available for any future claims. Review the full warranty details on Milgard’s website for complete terms and conditions.
Finding an AAMA Installation Masters Certified Installer
Locating an installer certified by the American Architectural Manufacturers Association (AAMA) as an Installation Masters is crucial for a successful Milgard window project. This certification signifies a high level of expertise and adherence to industry best practices. These installers demonstrate a thorough understanding of proper techniques, ensuring a weathertight and energy-efficient installation.
Milgard often provides resources on their website to help you find certified installers in your area. You can also search the AAMA directory directly. When contacting potential installers, verify their certification status and ask about their experience with Milgard windows specifically.
Don’t hesitate to request references and check online reviews. A certified installer will confidently showcase their qualifications and provide a detailed quote outlining the installation process.
Importance of Professional Installation
Professional installation is paramount for maximizing the benefits of your Milgard replacement windows. While DIY projects can seem appealing, improper installation can lead to air leaks, water damage, and reduced energy efficiency, negating the window’s performance. Certified installers possess the knowledge and tools to ensure a precise fit and proper sealing.
They understand the nuances of Milgard’s specific installation requirements, including correct shimming, fastening techniques, and insulation methods. A skilled installer will also meticulously inspect the rough opening, addressing any rot or damage before proceeding.
Investing in professional installation safeguards your investment and ensures long-term performance and warranty validity.